Friday, April 29, 2011

Berry Yummy


   "Sweet May hath come to love us,
   Flowers, trees, their blossoms don;
   And through the blue heavens above us
   The very clouds move on."
   -  Heinrich Heine, Book of Songs

May Day!  It comes tomorrow and the feeling of Spring and new beginnings and happiness abounds.  The shining sun, buzzing bees, and pretty flowers puts one in the mood for BBQ and lemonade and berries bursting with juice.  But, of course, the vines are yet empty.

Just because berries won't be available until summer, though, doesn't mean that we can't enjoy some right now!  Yarnberries are always in season!  


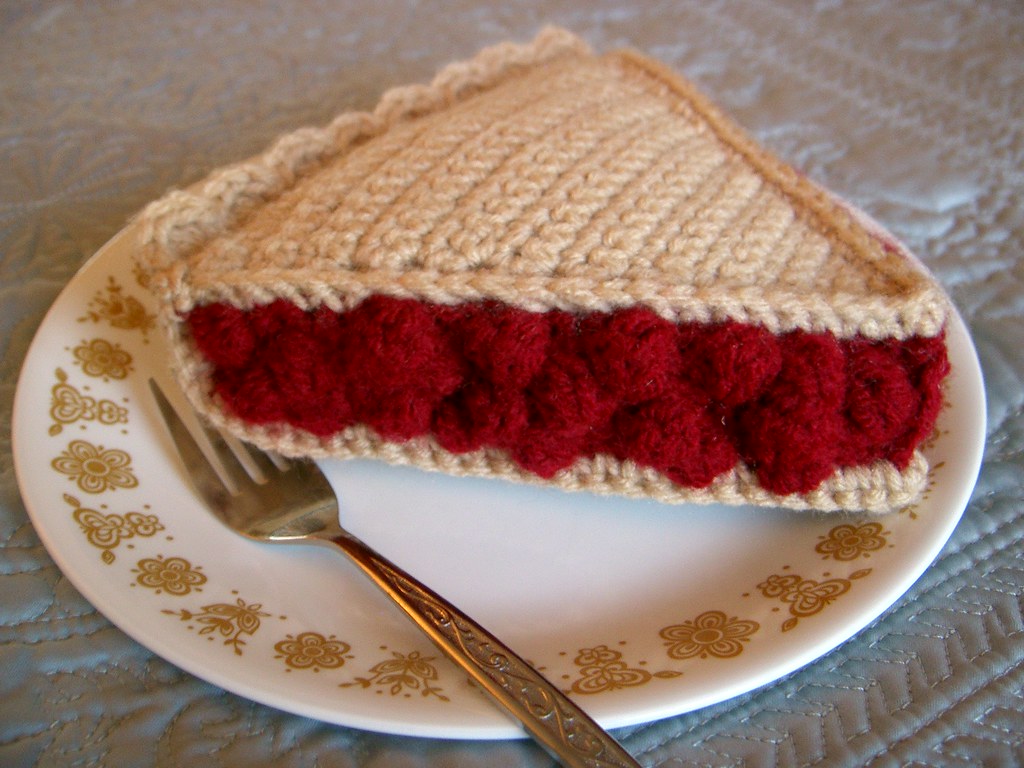
I thought about making a pie wedge or a tart, but settled on just a lovely bowl of fresh berries.  In honor of May Day, I'm offering both the berries and the dessert bowl patterns here for free!


Berry Berry
#
directions
1
ch 5, ss in the 1st ch, sc 6 into the ring
2
(inc, sc) – 9 st total
3
(dec, sc) – 6 st total
4
For a small, rounded berry, skip this step.
(sc) - 6 st total
5
fo, leave a long tail for sewing
close the opening:
use an embroidery needle to run the yarn from the inside of each st to the outside, then pull the yarn tightly to cinch the opening closed, weave in the loose end
This pattern is perfect for making blackberries, marionberries, boysenberries, salmonberries, and loganberries.  Yummy!

Dessert Bowl
rd
directions
total
1
mc hdc 6
6
2
ss into the 1st st, ch 2, hdc into the same st, (hdc inc)
12
3
for this round only, work into the back loops only:
ss into the top back loop of the ch, ch 2, hdc into the same st, hdc 2, (hdc inc, hdc 2)
16
4
ss into the top back loop of the ch, ch 2, hdc into the same st, hdc 3, (hdc inc, hdc 3)
20
5
ss into the top back loop of the ch, ch 2, hdc into the same st, hdc 4, (hdc inc, hdc 4)
24
6
ss into the top back loop of the ch, ch 1, hdc, [dc 2], [hdc, sc], sc), ([sc, hdc], [dc 2], [hdc, sc], sc)
42
7
fo, weave in loose ends


Please do not sell this pattern or reproduce it in any way.  If you would like to share it, please do not copy & paste, but instead link to this page.  Items made from this pattern are not to be sold under any circumstances.  This is a pattern free for your personal or charitable use only.  Thank you!


A perfect accompaniment to the Let's Do Lunch food set!
Happy May and Happy Crocheting!

Thursday, April 28, 2011

Peanut Butter Jelly Time

One of my very favorite things to crochet is food.  This might because I love cooking and baking actual edibles. Or, it might just be because yarn munchies are so cute and often really simple & quick to make.  They're great projects to use up those little bits of yarn, too.  My kids really love play food, so it gives me a good excuse to make more and more and more!

My latest foray into the culinary world of yarn is a group of goodies I've called Let's Do Lunch!  It is bread, plain cheese, Swiss cheese, meat, lettuce, tomato slices, butter, spread, a pickle spear, potato chips, bacon, and a cookie.  Not just any cookie.  Have you been to Ikea?  Have you had the jam cream cookies?  They are so good!  Well, that's the cookie in the pattern (one like it anyway).

So, here it is:

Available now on Etsy and Ravelry

Here are some tasty looking sides to go with your yarn lunch:


Many thanks to the designers!
Happy crocheting


Monday, April 25, 2011

Picnic Perfect

After enjoying many indoor activities over the winter, it's nice to celebrate Spring with a picnic.  Some tasty treats out in the fresh air under the blue sky.  Maybe feeding some friendly ducks.  Lovely!  And who always appreciates a good picnic?  Ants!  Oh - and don't forget bees.  They're regular connoisseurs!  Now, I wouldn't generally find their inevitable appearance welcome, but when the bugs are yarnies I don't mind a bit!
I was inspired the other day to crochet just such a happy picnic-going pair.  Meet Buzzle Bee and Picnic Ant:


Available on Etsy and Ravelry

I got into a discussion some years back with a coworker about what one should bring to a picnic.  Fried chicken?  Sandwiches?  Well, I guess everyone has their favorites - just don't forget the brownies!  
Here are some picnic-worthy patterns:


Thank you designers for these fantastic patterns!
Happy crocheting!


Thursday, April 21, 2011

Somebunny Special

Spring has sprung and Easter is quickly approaching.  There's a sense of holiday and happiness in the air.  In the spirit of the season, I give to you today some free bunny applique patterns!  Why an applique, you might ask?  Well, they're just great for lots of things:

  • Gift Adornment
  • Magnets & Fridgies
  • Embellishments for anything from hats to bags
  • Cute Easter Egg Stuffers
  • Little Decorations
  • Fun Pins (show your holiday cheer)
  • And...they're just fun to make!


Honey Bunnies
Somebunny is as sweet as honey!

Pink Bunny
#
directions
1
hdc mc 6
2
(hdc inc) - 12
3
ss 3, ch 3, ss in the same st
ss 6, ch 8, ss in the same st
dc, tc in the same st, dc in the same st, ss in the same st
ss2, fo, weave in loose ends

Yellow Bunny
#
directions
1
hdc mc 6
2
(hdc inc) - 12
3
ss 3, ch 3, ss in the same st
ss 5, ch 8, ss in the same st
ch 8, ss in the same st
dc, tc in the same st, dc in the same st, ss in the same st
ss3, fo, weave in loose ends

Blue Bunny
#
directions
1
hdc mc 6
2
(hdc inc) - 12
3
ss 3, ch 3, ss in the same st
ss 6, ch 8, ss in the same st
ch 8, ss in the same st
dc, tc in the same st, hdc in the same st, ss in the same st
ss2, ch 2, ss in the same st
fo, weave in loose ends


Please do not sell this pattern or reproduce it in any way.  If you would like to share it, please do not copy & paste, but instead link to this page.  Items made from this pattern are not to be sold under any circumstances.  This is a pattern free for your personal or charitable use only.  Thank you!


Funny Bunnies
Everybunny needs a good laugh!

Pink Bunny
#
directions
1
hdc mc 6
2
(hdc inc) - 12
3
ss
dc, tc in the same st, dc in the same st, ss in the same st
turn, ss 2 up the head
ch 8, ss in the same st
ss 2 back down the head
fo, weave in loose ends

Yellow Bunny
#
directions
1
hdc mc 6
2
(hdc inc) - 12
3
ss
ch 15, ss in the same st
fo, weave in loose ends


Please do not sell this pattern or reproduce it in any way.  If you would like to share it, please do not copy & paste, but instead link to this page.  Thank you!


Embellish with eyes, ribbon, beads, pompoms, or anything you’d like.


You can also make two of the same bunnies and whip stitch them together (with the backs on the inside – omit ears on the 2nd bunny).  This creates a more finished piece.


Happy crocheting!

Tuesday, April 19, 2011

Grin and Bear It

What's better than a good teddy bear?  So cute, always ready for a big hug, good at keeping your secrets, they love you unconditionally and forever.  Let's celebrate teddy!
Here are some teddy bear fun facts:

I recently completed my latest bear project - Ming Panda.  He's a peaceful little guy and has been entrusted to my son, who loves him already.  I made a pink and white one, too, for my daughter (she named her Belly).  I'm thinking a great big one would be fun to make.  Maybe someday...
Without further ado, here is Ming:

He's available now on Etsy and Ravelry

And here are some more little bears for your crocheting enjoyment:


Thank you designers, for the great patterns!

Long live teddy bears!!

Monday, April 18, 2011

Amigurumi Unite!


One thing that can make or break an amigurumi is the way it has been joined together and finished.
So much can go wrong...  One arm flapping listlessly on a loose seam, one leg jutting akimbo on stitches so tight that the yarn is puckering, missed and protruding stitches, tottering heads, lumpy tummies, stuffing showing through gaping stitch holes, woven loose ends peeking out, the list goes on and on.


The most important piece of advice is to take your time!  Plan what you need to do.  Read (and reread) your pattern.  If you don't know how to do something, don't guess - look it up!  And then, when you're ready, go slow.  Be precise and neat.


The second most important thing to remember is don't be afraid to try again!  You can undo and redo stitches as many times as you need to until you get it right.  Frog it!  Have you heard the term?  Just rip it, rip it, rip it - pull those stitches right out and try again!  Just don't forget to not weave in any loose ends until you know you're happy with what you've done (doing so makes it harder, though not impossible, to go back and fix mistakes).


Here are some more useful tidbits:
  • Amigurumi should have fairly tight stitches, so that the stuffing won't show through.  If you notice holes in your work, use a smaller hook and/or thicker yarn.
  • Even the best fiberfill stuffing can be lumpy if it isn't handled correctly.  Don't shove wads of stuffing into your ami.  Take a smallish lump, fluff it to remove any bunched pieces, and pull it so it is a wider, thinner piece.  Place the piece as far into the ami as it can go, spreading the edges to the sides.  Keep doing this, layering the fluffed pieces, until the ami is completely stuffed.
  • If you are making a long, thin piece that you stuffed as you went along (like a snake), it can look lumpy at the end.  Roll the finished piece gently between your palms to even the stuffing out a bit.  This technique can work wonders.
  • Always use invisible decrease so that your finished piece will have a neat and smooth look.  To invisible decrease: when you get to the place where you need to decrease, insert into the front loops only of the next two stitches, yarn over, pull the hook through two loops, yarn over, pull through the remaining two loops.  Invisible Decrease complete!
  • Use pins to fasten pieces together before you start stitching.  This makes it so much easier to get pieces sewn on straight and even!
  • Weaving in loose ends.  There are a lot of tutorials out there - many of them different.  
    What I do in most cases is this:  
    Make sure the tail is sticking out of the wrong side/back of the fabric.  Thread the yarn onto an embroidery needle.  Run the yarn under two to three back loops in a straight line (make sure you don't go all the way through both loops, or it will be visible from the front).   
    Pull the yarn so that it is snug, but not too tight (you don't want to affect the fabric itself or pull gaps between the stitches where stuffing might show through).
    Run the yarn through the next back loop, double back the way you came.  Run the working yarn right through the yarn tail itself, skip the next back loop that you stitched under, and run the working yarn under the next yarn back loops that you used.  You can repeat this step again to make the weave extra secure.  Cut the yarn and you're done!
    When the tails are the result of joining yarn, I double knot the yarn on the wrong side/back of the fabric before weaving in the loose ends.  This keeps the join from loosening and showing later.
    When the tails are the result of a tiny piece having been attached or from embroidery, I double knot the yarn on the wrong side/back of the fabric.  Then, I make a multi-strand simple knot and pull it tightly.  I do not weave in the ends.
  • Many patterns will leave you with a small hole that you'll need to sew closed.  Here's a great explanation from MyGurumi: closing final holes.  
  • Here are two different important techniques for joining pieces:
Do you have a cool trick or tip?  Please share - your comments are always more than welcome!


Here are a few super-cute and free projects - because we all need to keep practicing!  
Happy Monday and happy crocheting!


Crabby from Nareeoo


Little Mermaid from K & J Dolls


Bee from crochetandknitting.net


A huge thank you to the designers who provided these patterns!

Friday, April 15, 2011

A Grand Day


Even before the Easter Bunny hippity-hops onto the scene, it will be Grandparent's Day - on April 22nd, in fact.  Just enough time to make something cute and yarntastic for someone you love.  But what to make?
Here are some ideas:
  • A favorite animal or pet (use an existing pattern and add personalized features)
  • A bouquet of yarn flowers
  • A crocheted basket filled with yarn picnic foods (you can be like Little Red Riding Hood)
  • A bowl with crocheted fruits or veggies
  • A doll modeled after each grandchild with a locket & photo
  • A tea cozy
  • A crocheted airplane, train, car, hot air balloon, boat, or other vehicle (customized would be nice)
  • Grill foods
  • Just think what is important to the person - what's in their house, what stories do they tell, what do they love to do
  • And, for those of you with crafty grandparents, perhaps a crochet pattern or book!
And remember - it doesn't have to be your grandparent.  Any grandparent in your life would appreciate being thought of.  So make them feel special on this special day!
Do you have any Grandparent's Day crochet ideas or know of a pattern perfect for the occasion?  Please share - your comments are more than welcome!


And here is a gift from me - a free applique pattern with variations!


Glorious Grands Appliques
Pattern by Katie Christy, Yarnington
Grandma & Grandpa - so great, they're grand!


Head


#
directions
1
hdc 6 into a mc
2
ss, ch 1, hdc into the same st, (2 hdc in each st) X 5, ss into the ch
3
This is a bald head.  You can fo and weave in the loose ends if you’d like.  Or, move on to one of the hair instructions below.

Side Tufts
#
directions
1
ch 2, ss into the same st, join gray yarn
2
ss in the same st, ch 1, ss, sc, join tan yarn
3
ss 3, join gray yarn
4
sc, ss, join tan yarn
5
ch 2, ss in the same st, fo, weave in loose ends

Short Hair
#
directions
1
ch 2, ss into the same st, join gray yarn
2
ss in the same st, (ch 2, ss) X 6 *adjust number of repetitions to customize head shape, more for a rounder head, fewer for an oval head, join tan yarn
3
ch 2, ss in the same st, fo, weave in loose ends

Bun
#
directions
1
ch 2, ss into the same st, join gray yarn
2
ss in the same st, sc, hdc, ss in the same st, dc, tc in the same st, tc in the same st, dc in the same st, ss, hdc in the same st, sc, ss, join tan yarn
3
ch 2, ss in the same st, fo, weave in loose ends

You can also make an additional blank head piece and whip stitch it to the head-with-face piece (with the backs on the inside).  This creates a more finished piece – perfect for gift trimming and many other things!


Please do not sell this pattern or reproduce it in any way.  If you would like to share it, please do not copy & paste, but instead link to this page.  Items made from this pattern are not to be sold under any circumstances.  This is a pattern free for your personal or charitable use only.  Thank you!


Here are some more free patterns for you:


And Happy Early Grandparents Day to any of you out there with your own grandkids!!
Happy crocheting!